MK-PC107.Pheumatic pressure pump 0-0.7Mpa 0-7bar 0-1000psi


Notes:
1. The calibration bench should be used within the rated pressure range as much as possible, and overpressure greater than the maximum range of 2MPa is prohibited.
2. The calibration table should be placed on a stable operating platform to avoid entering corrosive gases and dust particles used in the environment.
3. When switching between pressure and vacuum, it must be carried out in a state of no pressure.
4. Use a lever to apply pressure (pressure handle ②), with even application force;
5. All handles and joints must not be operated with excessive force;
6. After prolonged use, apply an appropriate amount of lubricating grease to the threaded part.
7. Long-term storage should be in a dry, non-corrosive gas, and sun-proof environment.
Steps:
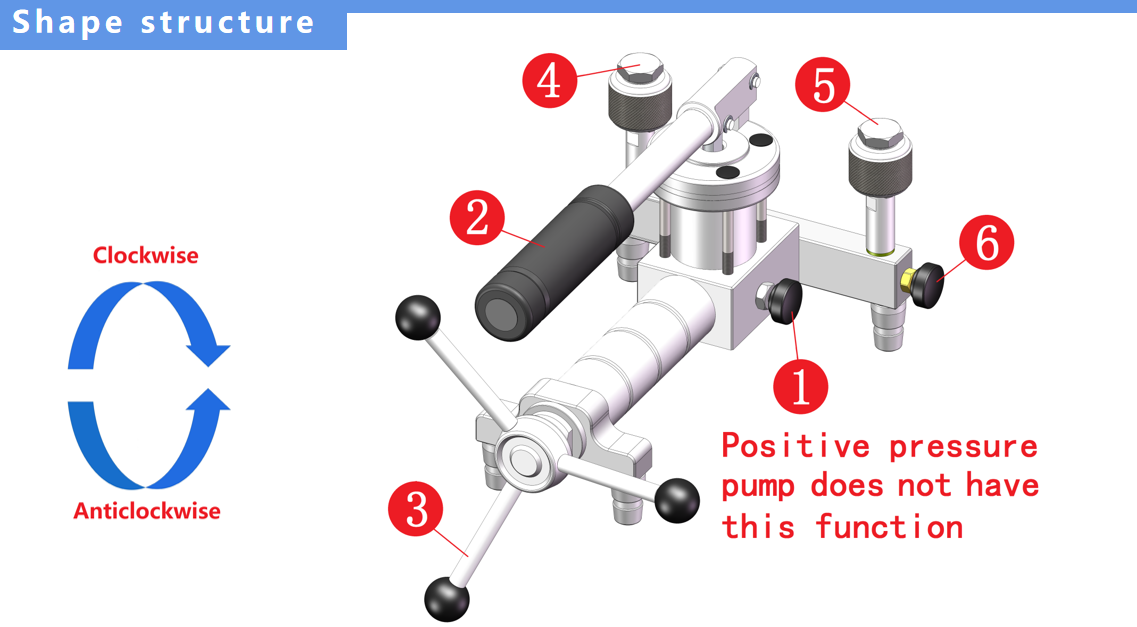
1. Connect the standard meter to the [Standard Meter Interface] ④ and the calibrated instrument to the [Pressure Test Interface] ⑤; (Keep the calibrated instrument clean and tidy)
2. Rotate counterclockwise to open 【 pressure relief valve 】 ⑥; When verifying negative pressure, push the pressure/vacuum conversion valve ① forward; When verifying positive pressure, pull out the pressure/vacuum conversion valve ①; (Positive pressure pump without pressure/vacuum switching valve)
3. Rotate 【 Fine adjustment handwheel 】 ③ (positive pressure) counterclockwise and (negative pressure) to one-third of the position;
4. Rotate clockwise to close 【pressure relief valve】 ⑥;
5. Hold the 【 Pressure handle 】 ② and repeatedly lift and lower the pressure (vacuum) to the desired value. When the pressure is high and the handle is difficult to press down, the lifting height can be reduced before pressing down. When the pressure reaches around 3MPa, it can be increased to 6MPa by adjusting the handwheel ③
6. Accurately adjust to the desired value through 【 Fine adjustment handwheel 】 ③;(Positive pressure) Rotate clockwise to increase pressure, (vacuum) Rotate clockwise to decrease vacuum
7. Return calibration, slowly open the pressure relief valve ⑦ to the desired value, and adjust the handwheel ⑥ precisely to the desired value through fine adjustment; After the calibration is completed, rotate counterclockwise to open the 【 pressure relief valve 】 ⑥ to relieve the pressure, and remove the calibrated gauge to complete this calibration Verification.